노마드 코더 [Javascript] 기초 - 줌 클론 코딩
코딩쟁이들이라면 들어봤을 법한 유튜버 '노마드 코더'의 Javascript 무료 강의로 아래 사이트에 들어가면 볼 수 있다.
줌 클론코딩 – 노마드 코더 Nomad Coders
WebSockets, SocketIO, WebRTC
nomadcoders.co
지난 번 socket.io를 이용하여 채팅까지 완성한 후, 이후 내용은 WebRTC를 이용하여 실제로 웹캠을 연결하여 화상 채팅을 구현하는 것이다.
1. WebRTC란?
Peer-to-Peer 방식으로 브라우저나 단말 간에 데이터를 주고받는 기술의 웹 표준을 말한다.
WebRTC
(Web Real-Time Communication)은 웹 애플리케이션과 사이트가 중간자 없이 브라우저 간에 오디오나 영상 미디어를 포착하고 마음대로 스트림할 뿐 아니라, 임의의 데이터도 교환할 수 있도록 하는 기술입니다. WebRTC를 구성하는 일련의 표준들은 플러그인이나 제 3자 소프트웨어 설치 없이 종단 간 데이터 공유와 화상 회의를 가능하게 합니다.
https://developer.mozilla.org/ko/docs/Web/API/WebRTC_API
WebRTC API - Web API | MDN
WebRTC(Web Real-Time Communication)은 웹 애플리케이션과 사이트가 중간자 없이 브라우저 간에 오디오나 영상 미디어를 포착하고 마음대로 스트림할 뿐 아니라, 임의의 데이터도 교환할 수 있도록 하는
developer.mozilla.org
1-1. WebRTC 연결 시나리오

위 그림대로 WebRTC 연결을 요청하면 되는데 PeerA에서 Offer를 만들고 PeerB에서 받은 Offer에 대해 Answer를 다시 PeerA로 보내 서로 LocalDescription과 RemoteDescription을 설정한다. 그런 다음 "icecandidate"이벤트를 이용해 서로 candidate를 주고받아 추가해 놓고 candidate로 주고받은 데이터의 stream을 추가해 놓으면 서로 화상 대화를 할 수 있다.
그림이 보기에는 복잡해보이지만 저 그림대로 차근차근 따라해보면 연결이 어렵지 않다.
2. 연결된 카메라 및 Stream 가져오기
//연결된 카메라 가져오기
async function getCameras() {
    try{
        const devices = await navigator.mediaDevices.enumerateDevices();
        const cameras = devices.filter(device => device.kind === "videoinput");
        const currentCamera = myStream.getVideoTracks()[0];
        cameras.forEach((camera) => {
            const option = document.createElement("option");
            option.value = camera.deviceId;
            option.innerText = camera.label;
            if (currentCamera.label === camera.label) {
                option.selected = true;
            }
            camerasSelect.appendChild(option);
        })
    } catch(e) {
        console.log(e);
    }
}

// 디바이스 ID로 meadia stream 가져오기
async function getMedia(deviceId){
    const initialConstraints = {
        audio:true,
        video: { facingMode:"user"},
    }
    const cameraConstraints = {
        audio: true,
        video: { deviceId : {exact : deviceId},},
    }

    try {
        myStream = await navigator.mediaDevices.getUserMedia(
            deviceId? cameraConstraints : initialConstraints
        )
        myFace.srcObject = myStream;
        if (!deviceId) {
            await getCameras();
        }
    } catch(e){
        console.log(e);
    }
}
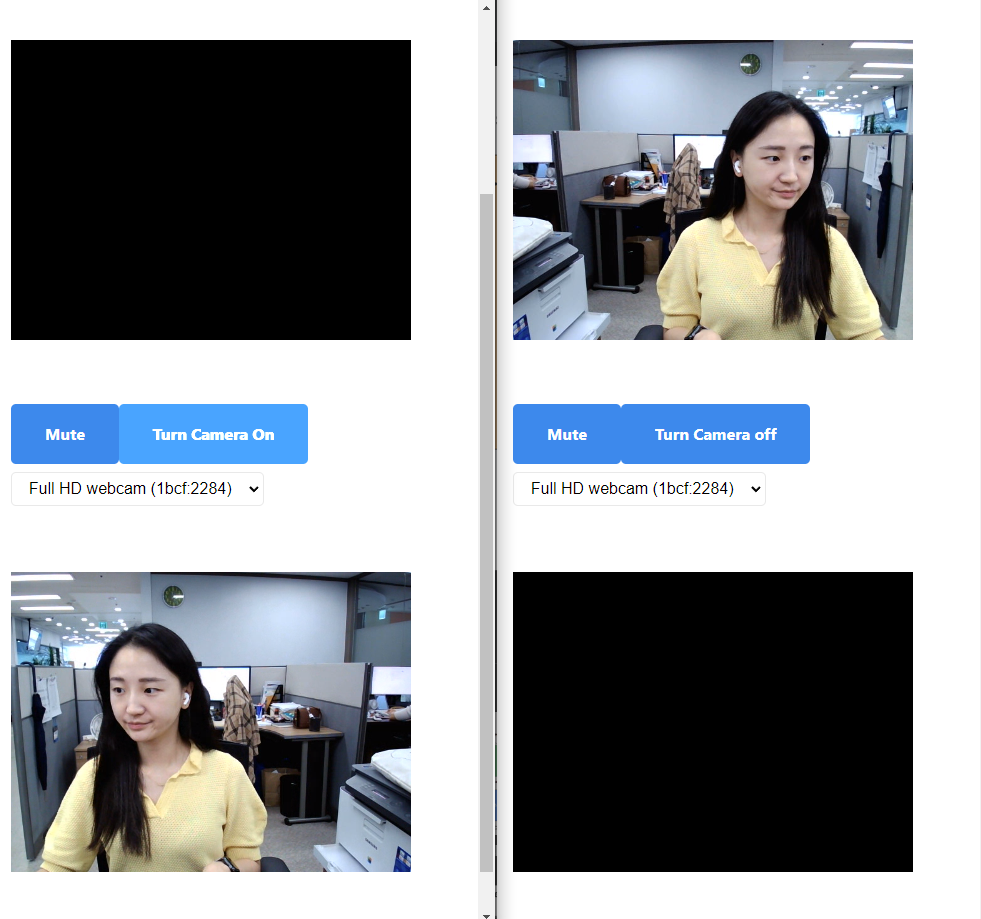
연결된 기기들에서 videoinput인 카메라를 가져오고 연결된 카메라들의 기기정보를 콤보박스에 등록한다. 콤보박스로 Select된 카메라의 deviceId로 media stream을 가져와 html 태그 video에 srcObject로 설정하면 화면이 나타난다.

노마드코더의 강의를 보고 실제로 구현해봤으며 연결된 카메라의 음성이나 영상을 껐다켰다도 할 수 있다. 다만 다수의 인원이 연결된 경우 부하가 일어날 수 있으니 주의할 것.
아래 실제로 구현한 Socket과 RTC 코드를 첨부한다.
// Socket Code

socket.on("welcome", async () => {
    const offer = await myPeerConnection.createOffer();
    myPeerConnection.setLocalDescription(offer);
    console.log("sent the offer");
    socket.emit("offer", offer, roomName);
})

socket.on("offer", async (offer) => {
    console.log("received the offer");
    myPeerConnection.setRemoteDescription(offer);
    const answer = await myPeerConnection.createAnswer();
    myPeerConnection.setLocalDescription(answer);
    socket.emit("answer", answer, roomName);
    console.log("send the answer");
});

socket.on("answer", async (answer) => {
    console.log("received the answer");
    myPeerConnection.setRemoteDescription(answer);
});

socket.on("ice", (ice) => {
    console.log("received the candidate");
    myPeerConnection.addIceCandidate(ice);
})

// RTC Code

function makeConnection() {
    myPeerConnection = new RTCPeerConnection({
        iceServers: [
            {
                urls: [
                    "stun:stun.l.google.com:19302",
                    "stun:stun1.l.google.com:19302",
                    "stun:stun2.l.google.com:19302",
                    "stun:stun3.l.google.com:19302",
                    "stun:stun4.l.google.com:19302",
                ],
            },
        ],
    });
    myPeerConnection.addEventListener("icecandidate", handleIce);
    myPeerConnection.addEventListener("addstream", handleAddStream);
    myStream.getTracks().forEach((track) => {myPeerConnection.addTrack(track, myStream)});
}

function handleIce(data) {
    console.log("sent the candidate");
    socket.emit("ice", data.candidate, roomName);
}

function handleAddStream(data) {
    const peerFace = document.getElementById("peerFace");
    peerFace.srcObject = data.stream;
    console.log("got an stream from my peer");
}
실제로 구현해보니? 크게 어렵진않았지만 사실상 다수의 인원이 동시접속했을 때 처리하는 게 KeyPoint라 그건 나중에 도전해보는걸로 ㅎㅎㅎ

'개발 Study > Node' 카테고리의 다른 글
| [Node.js] 공공 오픈 API 이용하기 - 사업자 휴/폐업 실시간 조회 (5) | 2022.10.20 |
|---|---|
| [Node.js] 비밀번호 암호화(bcrypt HASH) (0) | 2022.10.06 |
| [SocketIO/WebRTC] 줌 클론 코딩(1) - Socket.io로 채팅 만들기 (3) | 2022.08.22 |
| [Error] npm i @socket.io/admin-ui 설치 에러 해결 (1) | 2022.08.19 |
| [Node.js/Mongoose] 실시간 채팅 구현하기 - CRUD API 생성하기 및 Express 라우터 사용 (0) | 2022.07.13 |


댓글