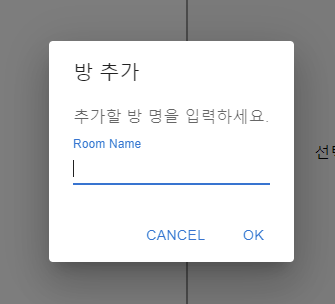
React에서 자주 쓰는 UI Framework 중 내 마음에 끌리는대로? 그 중 자주 쓴다는 Material UI를 이용해 Javascript의 Prompt 같이 입력하고 그 값을 받을 수 있는 Dialog를 만들어 보도록 하자.
1. Material UI 설치
MUI: The React component library you always wanted
MUI provides a simple, customizable, and accessible library of React components. Follow your own design system, or start with Material Design. You will develop React applications faster.
mui.com
$npm install @mui/material @emotion/react @emotion/styled
npm으로 material을 설치하면 기존 react 버전과 호환이 안될 수도 있으니 에러가 난 경우 아래 글을 참고하여 다운그레이드를 해줘야 한다.
2022.07.06 - [개발 Study/Node, js, react] - [React/Error] React 버전 변경/다운그레이드 및 에러 해결
[React/Error] React 버전 변경/다운그레이드 및 에러 해결
*create-react-app 설치 후 다른 모듈 설치 시 버전 호환 문제 실시간 채팅 프로젝트를 위해 react 개발환경을 다음과 같이 설치 했다. $npx create-react-app chat 그런 다음 react ui를 사용하기 위해 관련 모..
chuun92.tistory.com
2. FormDialog 긁어오기
https://mui.com/material-ui/react-dialog/
React Dialog component - Material UI
Dialogs inform users about a task and can contain critical information, require decisions, or involve multiple tasks.
mui.com
이 페이지를 참고하면 FormDialog 예제가 나오는데 해당 코드를 변형하여 나한테 맞게 Custom해 보도록 하겠다.

3. FormDialog 컴포넌트 생성
OK/Cancel 두 개의 버튼을 생성해주고 Props로는 제목/내용/placeHolder/오픈된 상태/submit함수 를 받았다.
@mui/material에서는 필요한 Component들만 추가해주는게 추후 빌드시 용량 줄이는데도 좋다.
State로는 open된 상태랑 현재 입력된 Text를 받고있다. Textfield에서 change가일어나면 text state를 변경하도록했고, OK와 Close버튼을 클릭하면 open state를 변경하도록 했다.
useEffect()를 통해 부모 컴포넌트에서 Dialog를 open할 수 있도록 isOpen props를 연결하여 값 변경 시 함수가 동작되도록 만들었다.
import * as React from 'react';
import {TextField, Dialog, DialogActions, DialogContent, DialogContentText, DialogTitle, Button} from '@mui/material';

export default function FormDialog({title, content, placeholder, isOpen, submitValue}) {
  const [open, setOpen] = React.useState(false);
  const [text, setText] = React.useState('');
  const changeText = (e) => {
    if (text !== e.target.value)
        setText(e.target.value);
  }
  const handleClose = () => {
    setOpen(false);
  };
  const handleOK = () => {
    setOpen(false);
    submitValue(text)
  };
  React.useEffect(() => {
    setOpen(isOpen);
  },[isOpen]);

  return (
    <div>
      <Dialog open={open}>
        <DialogTitle>{title}</DialogTitle>
        <DialogContent>
          <DialogContentText>
            {content}
          </DialogContentText>
          <TextField
            autoFocus
            margin="dense"
            id="name"
            label={placeholder}
            type="text"
            fullWidth
            variant="standard"
            onChange={changeText}
          />
        </DialogContent>
        <DialogActions>
          <Button onClick={handleClose}>Cancel</Button>
          <Button onClick={handleOK}>OK</Button>
        </DialogActions>
      </Dialog>
    </div>
  );
}
4. FormDialog 사용
사용하고 싶은 곳에 아래와 같이 입력하여 넣어보았다. submitValue에는 부모 컴포넌트에서 생성한 함수를 넣어 입력된 text를 받아와서 저장하도록 만들었다.
<FormDialog title={'방 추가'} content={'추가할 방 명을 입력하세요.'} placeholder={'Room Name'} isOpen={AddRoomOpen} submitValue={newRoom}/>
오늘 만든 Dialog는 실시간 채팅 구현시에 사용될 것이다. ㅎㅎ
'개발 Study > React' 카테고리의 다른 글
| [Error] Redux createStore 에러 처리 (deprecated) (0) | 2022.08.01 |
|---|---|
| [React] UseEffect, UseRef 사용법 (0) | 2022.07.29 |
| [React] 실시간 채팅 구현하기 - Login 페이지 생성 (3) | 2022.07.25 |
| [React/Error] React 버전 변경/다운그레이드 및 에러 해결 (2) | 2022.07.06 |
| [React] npm으로 react 프로젝트 생성하기 (0) | 2022.07.04 |


댓글