
이전에 리덕스 관련 글은 아래를 참조하자.
2022.08.04 - [개발 Study/Node, js, react] - [React/Redux] Redux 사용법 (1) -State/Action/Reducer/Store
[React/Redux] Redux 사용법 (1) -State/Action/Reducer/Store
Redux란? 상태 관리 라이브러리로 Component별로 props/state를 바꿔주는 복잡한 관계를 redux 하나로 외부에서 state들을 공용으로 관리하여 가져다 쓸 수 있다. 1. State(상태) State란 React Component 내에..
chuun92.tistory.com
2022.08.05 - [개발 Study/Node, js, react] - [React/Redux] Redux 사용법 (2) - UseDispatch/UseSelector
[React/Redux] Redux 사용법 (2) - UseDispatch/UseSelector
2022.08.04 - [개발 Study/Node, js, react] - [React/Redux] Redux 사용법 (1) -State/Action/Reducer/Store [React/Redux] Redux 사용법 (1) -State/Action/Reducer/Store Redux란? 상태 관리 라이브러리로 Com..
chuun92.tistory.com
새로 고침하면 Redux로 저장한 State들이 날아가는데 Login 후 다음페이지에서 새로고침해도 로그인 정보가 그대로 남길 바란다면!!
Redux-persist를 이용하여 Local Storage에 Login 상태를 저장하도록한다.
나는 현재 대화방에 접속한 User의 정보를 유지하기 위해 Redux-persist를 알아보았다.
1. PersistReducer 생성하기
Redux-persist를 설치한 후 persistReducer를 생성한다.
key 값은 reducer의 어느 지점에서부터 데이터를 저장할 것 인지 넣고, whitelist는 저장할 상태 값을 가진 reducer를 넣으면 된다. 나는 UserReducer를 만들 때 아래와 같은 상태 값을 갖도록 했기 때문에 사용자 정보를 저장할 수 있다.
const initialState = {
  User : {
    id : '',
    nickname : '',
  }
};
persistReducer 안에 설정한 config 값과 reducer들을 묶어준 rootReducer를 넣어준다.
import { combineReducers } from "redux";
import { persistReducer } from "redux-persist";
import storage from "redux-persist/lib/storage";
import userReducer from "./userReducer";
import chatReducer from "./chatReducer";

const persistConfig = {
  key: "root",
  storage,
  whitelist: ["userReducer"]
};
const rootReducer = combineReducers({
  userReducer, chatReducer
  });

export default persistReducer(persistConfig, rootReducer);2. PersistStore/PersistGate 설정하기
<App/> 컴포넌트를 넣어주는 index.js로 넘어가 persistStore와 persistGate를 생성하여 아래와 같이 생성해준다.
import React from 'react';
import ReactDOM from 'react-dom';
import './index.css';
import App from './App';
import store from './redux/store';
import { Provider } from "react-redux";
import reportWebVitals from './reportWebVitals';
import { createBrowserHistory } from "history";
import { BrowserRouter} from "react-router-dom";

import { persistStore } from "redux-persist";
import { PersistGate } from "redux-persist/integration/react";

const persistor = persistStore(store);

const history = createBrowserHistory({ window });

ReactDOM.render(
  <Provider store={store}>
    <PersistGate loading={null} persistor={persistor}>
      <React.StrictMode>
        <BrowserRouter history={history}>
          <App />
        </BrowserRouter>
      </React.StrictMode>
    </PersistGate>
  </Provider>, document.getElementById('root')
);

// If you want to start measuring performance in your app, pass a function
// to log results (for example: reportWebVitals(console.log))
// or send to an analytics endpoint. Learn more: https://bit.ly/CRA-vitals
reportWebVitals();
3. 결과
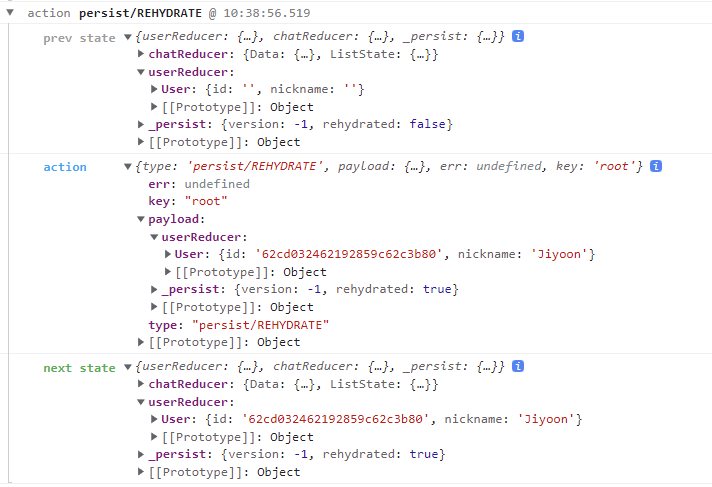
redux-persist 는 PERSIST -> REHYDRATE 순으로 액션이 일어나면서 REHYDRATE에서 storage에 저장된 값을 가져와 state를 설정해주는데 새로고침해도 로그인한 User 정보가 유지되는 것을 볼 수 있다.
'개발 Study > React' 카테고리의 다른 글
| [React/NextJS] NextJS 시작하기 (1) - NextJS vs ReactJS / CSR vs SSR (5) | 2022.09.05 |
|---|---|
| [Error] NextJS 에러 처리 - Parsing error : Cannot find module 'Next/babel' (3) | 2022.09.01 |
| [React/Redux] Redux 사용법 (2) - UseDispatch/UseSelector (0) | 2022.08.05 |
| [React/Redux] Redux 사용법 (1) -State/Action/Reducer/Store (0) | 2022.08.04 |
| [Error] Redux createStore 에러 처리 (deprecated) (0) | 2022.08.01 |


댓글